
Office of Sponsored Projects
UIT Administrative Computing Services
eProposal User Guide
A Complete Reference for v2.0
Using this Guide
This guide is both a complete and quick reference for eProposal preparers, approvers and college/department administrators. Quickly jump to specific topics using the table of contents (above) or the bookmarks in the navigation pane of your Adobe Reader.
Additionally there are separate guides available that include only those sections pertaining to approvers and college/department administrators.
Several sections within this guide use the format of first describing a page within the application and then displaying a figure that references the paragraphs directly above it.
Quick Tips
By the end of August 2011, all users must switch over to the new version of eProposal.
Overview
What is eProposal?
eProposal is a web-based system that provides for electronic preparation, submission, review and approval of what has historically been known as the Document Summary Sheet (DSS). As the goal of eProposal is to provide for an all-electronic process the need for a printed and signed paper DSS has been eliminated. Therefore using the term “an eProposal” is synonymous with a “DSS”.
The eProposal system is made up of:
- The form presented as a “wizard” (a series of pages that guide the user through the data collection process)
- Electronic approval routing and email notifications
- Integration of eProposal data into PeopleSoft by the Office of Sponsored Projects
- College/Department setup and maintenance of approval roles
- OSP specific pages for maintenance of general settings
The Business Process
This new version of eProposal introduces electronic approvals which replaces the need for printing a paper DSS and manually routing it for the appropriate signatures. The data collection and submission for approval in the new system remains the same as the prior version. It is expected that beginning August 2011, all users must be switched over to the new version of eProposal. At that time, the previous version will be sunset.
An outline of the overall process of preparing and submitting an eProposal is described below. (See Appendix 2 for a diagram of the lifecycle of an eProposal).
- The person preparing the eProposal (status shows In-Progress):
- Navigates through all pages in the wizard and fills out all required information
- Reviews the approval preview list and adds any additional approvers that may be required (See Step 2: Filling out the Form, Approvals Page)
- Submits the eProposal for electronic approval
- The people who are assigned as approvers for the eProposal (status shows Pending Approval):
- Are notified by email that an eProposal is pending their approval
- Review and approves the eProposal. If corrections are needed they may send it back to the preparer to revise & resubmit.
- The Sponsored Projects Officer (SPO) assigned to the eProposal (status shows In OSP Review):
- Reviews the eProposal according to existing business processes
- Validates that the necessary approvals have been satisfied. If corrections are needed he/she can send it back to the preparer to revise and resubmit. No further approvals are needed upon resubmission as long as changes are not made to the PI or Financially Responsible Department.
- Integrates the eProposal into PeopleSoft to initiate the project setup process
- The eProposal status is updated to Review Complete
Getting Started
Roles & Security
There are six roles that determine both what the user can see and which actions he/she can perform within eProposal. When a user logs into the system the application determines which menus, reports and home page worklists the user should see based on his/her roles:
| Role | Decription |
| Preparer/Creator |
Initiates and creates eProposals. Has full access to make changes to those which he/she has created until an eProposal is submitted. |
| Proxy | Has delegated security access to one or more eProposals. Has full access to make changes to those which he/she has been granted access until an eProposal is submitted. |
| Approver |
Designated as an approver for one or more approval roles required for the eProposal. Has read-only access to eProposal content for eProposals needing his/her approval. |
| Administrator |
Assigned at the college, department, center, or institute level by OSP. Maintains other admins. Maintains approvers and approval roles for their organization. |
| Sponsored Projects Officer |
Reviews approved eProposals according to established processes. Has full access to make changes even after an eProposal has been submitted for approval. |
| OSP Super User |
Designates administrators at the college, department, institute, or center level. Helps maintain and setup approvers and approval roles for all organizations. Has full access to make changes even after an eProposal has been submitted |
Table 1: eProposal Roles
Approvals
New for this version is the electronic collection and tracking of approvals. Approvals are meant to be configured by each college and department as business processes differ across the university. While self configuration is a main goal, there are some approvals that may seem new to some users. An email notification is sent to each approver when an approval becomes ready for his/her approval. An approver can view and approve eProposals that have been submitted, but are not yet ready for his/her approval.
Understanding Levels
An approval level indicates the order by which approvals will be satisfied. Levels can be any number and normally occur from lowest to highest. Multiple approvals at the same level are satisfied concurrently as both must be completed before the next higher level approver will be notified of his/her pending approval. While the notifications will occur in order, approvers may still approve in any order.
Although they may vary by organization, generally levels are setup such that approvals are satisfied in this order:
Level 1: PI and CO-PIs
Level 3: Center or Institute Director
Level 5: Department Chair
Level 8: College Dean
Quick Tips
An approval level indicates the normal order by which approvals are satisfied.
Approval Types
There are two types of approvals in eProposal, those that are generated automatically and those that can be added ad-hoc.
Ad-Hoc Approvals
Ad-hoc approvals can be added by any individuals with access to an eProposal. These approvers are specific individuals needed to review and approve the eProposal. Ad-hoc approvals are added by entering a level and the approver’s name. The level should be entered such that the new approver will satisfy his/her approval in the desired order. (See: Preparing an eProposal, Step 4: Adding Ad-Hoc Approvals)
Auto-Generated Approvals
Auto-generated approvals are those that are automatically added based on defined rules referencing information within the eProposal such as the principal investigator and the financially responsible department and college. Auto-generated approvals are different from ad-hoc approvals in that they assign approval roles to the eProposal instead of individual people.
These approvals are generally setup for center and institute directors, department chairs, and college dean approvals. Additional approvals may also be configured by college and department administrators. (See: For College/Department Admins, Maintaining Approvals)
Approval Roles
Approval roles are setup by college and department administrators who then assign one or more people who are authorized to approve for that role. One person is designated as the primary approver who is the recipient of all email notifications when approvals become pending for that role to approve. (See: For Approvers)
Assigning Approvals
College dean, department chair, and center/institute director approvals are added based on whether or not an approval role has been setup for that organization’s identification number (OrgID). If an approval role is not setup for an OrgID then one is not added to the eProposal. (See: Approval Flow Diagram in Appendix 2)
College and departmental administrators have the responsibility of setting up and maintaining approval roles and assigning one or more people to those roles.
Approvals are assigned to an eProposal based on the following five rules:
| Role & Level | Rules | Field on eProposal |
| PI & Additional Personnel (Level 1) | These individuals are explicitly listed on the eProposal and each is required to approve before the next level approvers are notified. | Listed as PI or Additional Personnel |
|
Center/Institute Director (Level 3) |
If the department with Financial/Administrative responsibility for the project has been identified as a Center or Institute, then all approval roles setup for that OrgID are added. All approvals relating to this center or institute should be setup with this same OrgID. |
Financial/Administrative Resp. Dept/Division. |
|
Department Chair (Level 5) |
Based on the PI’s home department. Approvals are setup by default at the OrgID where the Chair is assigned. Because the PI’s home department could be at a lower level than where the approval is setup, if an approval has not been setup for that OrgID, then the process rolls up the department tree until an approval is identified. All approval roles setup for that OrgID are added. All approvals relating to this department should be setup with this same OrgID. | Department ID (DeptID) listed for Principal Investigator |
|
College Dean (Level 8) |
This is the OrgID listed as the college for the Financial/Administrative Resp. Dept/Division. All approval roles setup for that OrgID are added. All approvals relating to this college should be setup with this same OrgID. |
College listed for Financial/Administrative Resp. Dept/Division. |
|
Vice President for Research (Level 20) |
This role is intended to be the final approval for an eProposal, but is not always required. It is automatically added only when one or both of the following questions are answered YES. Additionally, the associated documents required for each question must also be attached in order to pass validation and submit the eProposal for approval. |
1g. Will a waiver or reduction in the negotiated F&A rate for this project be requested? 1h. (Will the University cost share any of the expenses for this project?) |
Table 2: Approval Types
Quick Tips
For more details on approvals, see the Approval Flow Diagram in Appendix 2.
Email Notifications
The new eProposal is equipped to send email notifications. Accordingly, all people using eProposal must have a valid University of Utah email address. In the event that a preferred email address cannot be found in PeopleSoft, the system will use the uNID@utah.edu email address for notifications. All university employees have this address by default (for uMail).
All notifications include summary information and a direct link to the eProposal. Notification types are outlined below.
Quick Tips
Emails are sent as notifications to PIs and approvers at each step of the process.
Principal Investigator
The PI and creator (PI only if they’re the same person) of the eProposal will receive notifications when:
- An approver or someone in OSP has requested that the eProposal be revised and resubmitted along with the person’s comments.
- An approver has not approved the eProposal along with the approver’s comments.
- All approvals have been satisfied for the eProposal and it is now received in OSP and ready to be reviewed.
Approvers
The approvers will receive email notifications (who are either listed as either the primary approver for the approval role, or are individually listed as an ad-hoc approver) when:
- An approval becomes pending/ready for the approver after lower level approvals have been satisfied.
Sponsored Projects Officers (SPOs)
SPOs working in the Office of Sponsored Projects receive notifications for those which they have been assigned when:
- All approvals have been satisfied and the eProposal is ready for OSP’s review.
Quick Tips
New Timeout! Leave & return to eProposal without being timed-out all day.
eProposal Application
With a general understanding of the details of why eProposal works the way it does, this next section provides detailed examples and a quick tour of the application.
New Features
There have been so many improvements in the new version that it’s impossible to list everything here. Highlights include:
- Electronic approvals
- College/Department maintained approval roles
- 10 hour timeout. Work without being kicked out every 45 minutes!
- A completely new way to fill out proposal information with validation along the way
- Validation icons that indicate missing information
- Home page with personalized worklists
- Type-Ahead/Auto-Complete searches for PI, sponsor, department contacts, approvers etc…
- Pages are automatically saved when moving from page to page
- A tracking/audit page that shows the progress, dates and any comments of actions taken on each eProposal
- Enhanced reporting
- Email notifications that include a direct link to the eProposal
New Users Quick Tour
The quick tour is intended to give new and returning users a “lay of the land”. It’s recommended that readers open eProposal application and click through the pages and features as they are being described to get a hands-on feel for the eProposal application.
Quick Tips
See Appendix 1 for a step-by-step guide on creating a new eProposal.
Launching eProposal
Access eProposal by either:
- Logging on to the CIS (Campus Information Services)
- Locate the Research Administration Pagelet (it may need to be added using the Content link in the upper right corner of CIS)
- Select the eProposal (new) link. (The older version of eProposal will remain linked from this pagelet until the entire university has switched to the new version
- Go directly to the application’s URL (bookmarking this link is recommended):
- https://www.acs.utah.edu/uofu/fac/eProposal
- Sign in using a CIS uNID and password
Quick Tips
Simple Sign-inBookmark the URL to eProposal and go directly to the application.
My eProposal Home
The application will open to the Home page, which contains a few different sections:
- Top menu bar: Home, DSS (create, search, print, delete [OSP only]), Reports, Maintenance (for administrators, approvers and OSP users), and Help (link to documentation)
- Personalized worklists: displays eProposals pending the user’s action as well as all eProposals that are still in process, pending approval or completed/withdrawn.

Figure 1: My eProposal Home
Quick Tips
Worklists
A personalized view of all the eProposals needing your attention.
Edit/View a DSS
If an eProposal is not viewable in one of the worklists on the home page, then use this search to edit or view any eProposal. Search by any combination of:
- DSS Number – this is the proposal ID given to the eProposal (PID)
- PI EmplID – the employee ID of the principal investigator. Start typing the first or last name or ID of the person and a drop down box will appear. Select desired individual within the list to use as a search parameter.
- Sponsor ID – This is the sponsor’s long name. In the same way the employee box works, begin typing either the id or name of the sponsor and a drop down will appear. Select desired sponsor within the list to use as a search parameter.
- COI Number – the conflict of interest number for the PI or any other personnel listed on the eProposal.
- Short Title – the short title entered for the eProposal.

Figure 2: Edit/View DSS Page
Quick Tips
Searching
What you type into the search field shows up in font. You must still select your choice in the drop down
When search results are displayed, the proposal ID is displayed as a hyperlink (underlined) for only those eProposals within the user’s security. Otherwise, the summary information is displayed and the detail remains confidential.

Figure 3: Security in Search Results
Wizard User Interface
The entry pages for creating and modifying an eProposal have been changed to be a series of smaller pages that contain logical groupings of similar data. Moving through the pages is easy and does not require that all information on a page be completed before moving on to a different page or section.
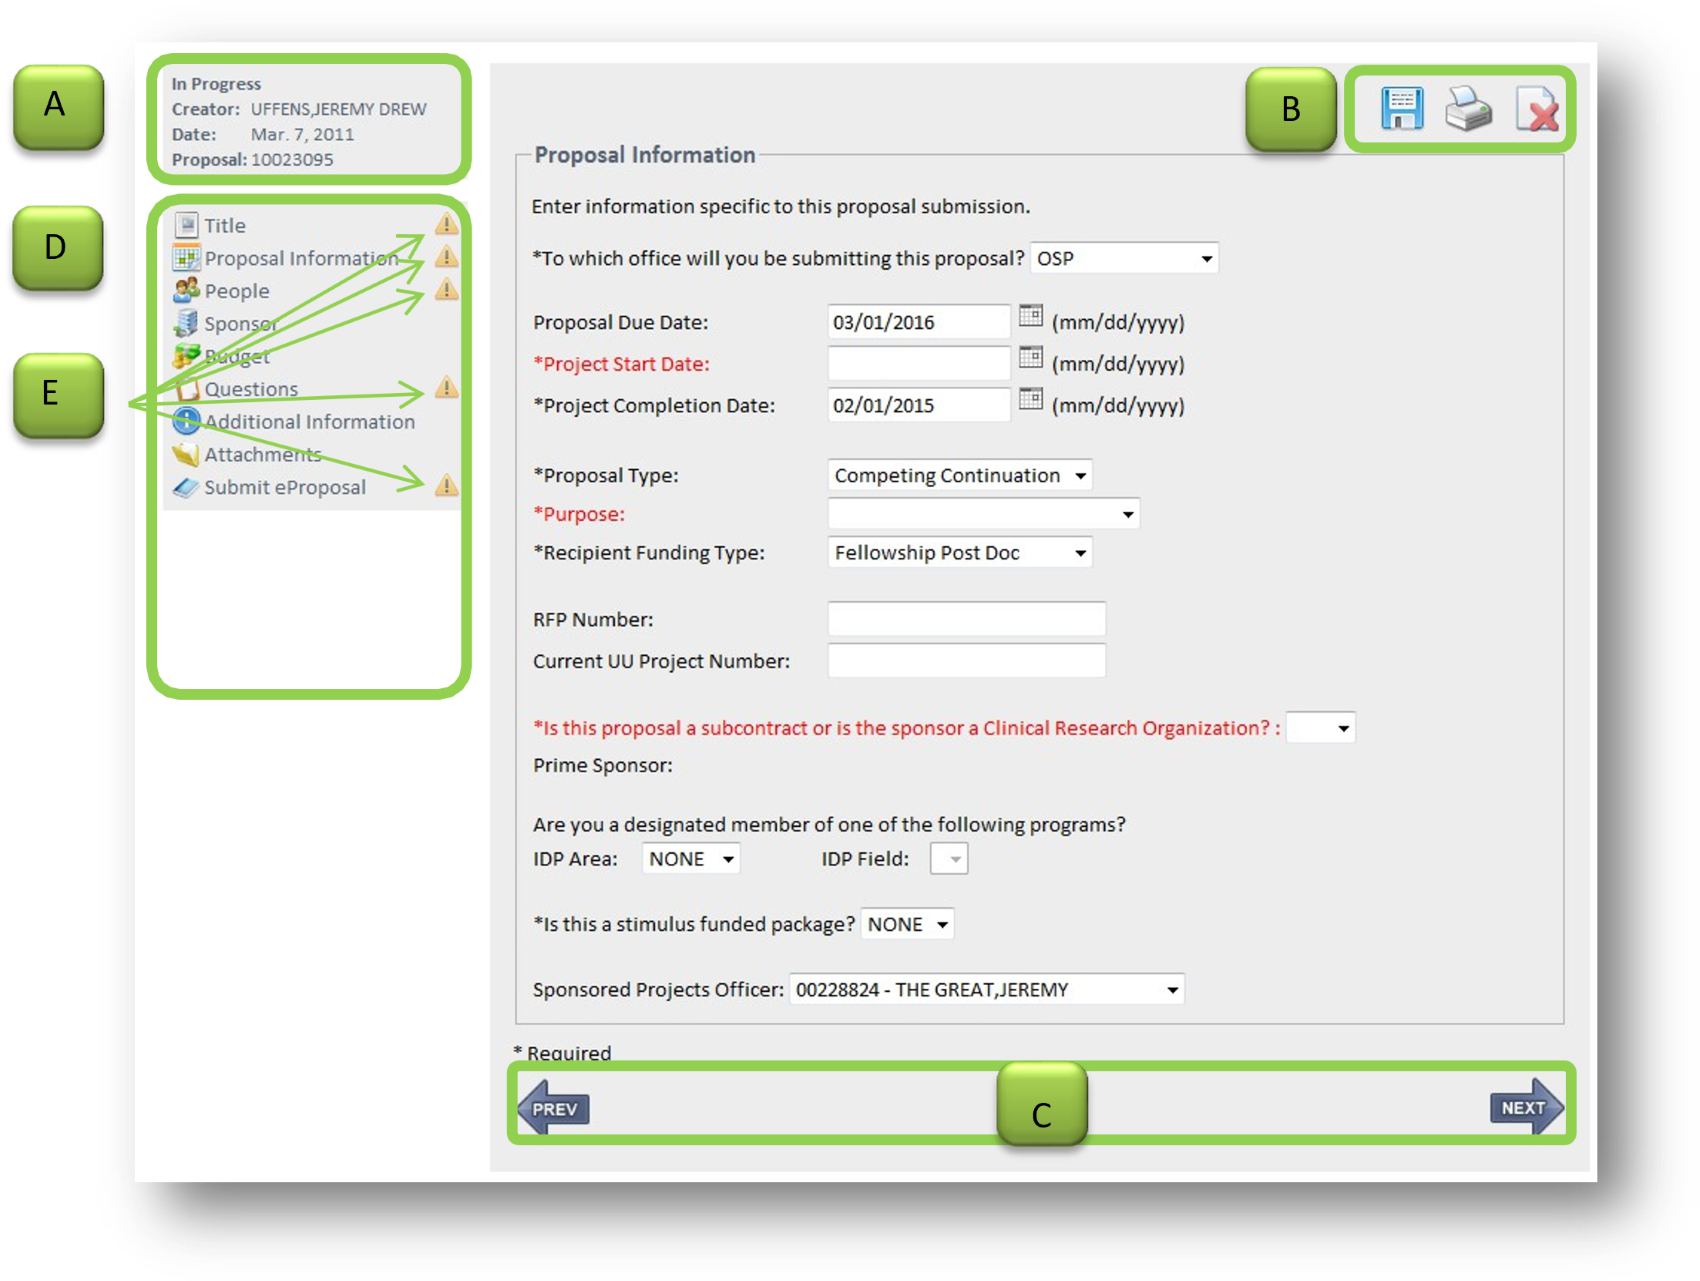
Figure 4: Wizard User Interface
Quick Tips
Finish Later?
It may take more than one session to complete your eProposal. Now it’s easier than ever to come back and pick-up where you’ve left off.
Figure 4 illustrates the following:
- Status information including the current state of the eProposal, the name of the preparer, the creation date, and proposal ID
- Buttons for saving, printing and withdrawing
- Navigation using the next and previous arrows at the bottom of each page
- Navigation using the Section Navigation links
- Validation indicators that display when required information is missing from a section. Required data elements are identified with an * next to the label. After an initial save, the labels turn red if the required information is still missing. (see Step 3: Resolving Validation Errors)
Quick Tips
Automatic Save
Pages are saved automatically when you click on the Next and Previous arrows.
Monitoring & Tracking Tools
Several new tracking features have been added to eProposal to help monitor the lifecycle of an eProposal. These include personalized user worklists and a special tracking/audit page for each eProposal.
Worklists
The worklists on the home page are a great tool to keep track of things. (See My eProposal Home). When the flag icon ( ) is displayed then someone associated with that eProposal has made a note which is made visible by using the mouse to hover over the icon. The worklists that are visible are dependent on the roles that the user has and are detailed below.
Being Prepared
The Being Prepared worklist includes eProposals that were created by the user and have not yet been submitted for approval. Included is the date that the eProposal is due at OSP as well as the sponsor’s due date. Proposals are due 5 days before the sponsor’s due date. Click on the OSP Due Date header to view a memo from the VP for Research regarding this policy. Clicking on the proposal ID will open the first page of the wizard interface.

Figure 5: Being Prepared Worklist
Quick Tips
OSP Due Date
Policy states that eProposals are due to the Office of Sponsored Projects 5 days prior to the sponsor’s due date.
My Submitted DSSs
The My Submitted DSSs worklist includes those eProposals that have been submitted for approval. Select whether to view only those that are Pending Approval, In OSP Review, or All proposals via the drop down menu. Clicking on the proposal ID will display the Review & Approve page along with any pending approvals. No changes to the eProposal are allowed in this state.

Figure 6: My Submitted DSSs Worklist
Completed DSSs
The Completed worklist displays a history, by year, eProposals that have been approved and reviewed by OSP. The drop down menu will display all years for which a user has created an eProposal. The current year will display and no data for new users who have not yet completed an eProposal. eProposals that have been withdrawn can also be displayed in this worklist. No further changes can be made to eProposals in this state.
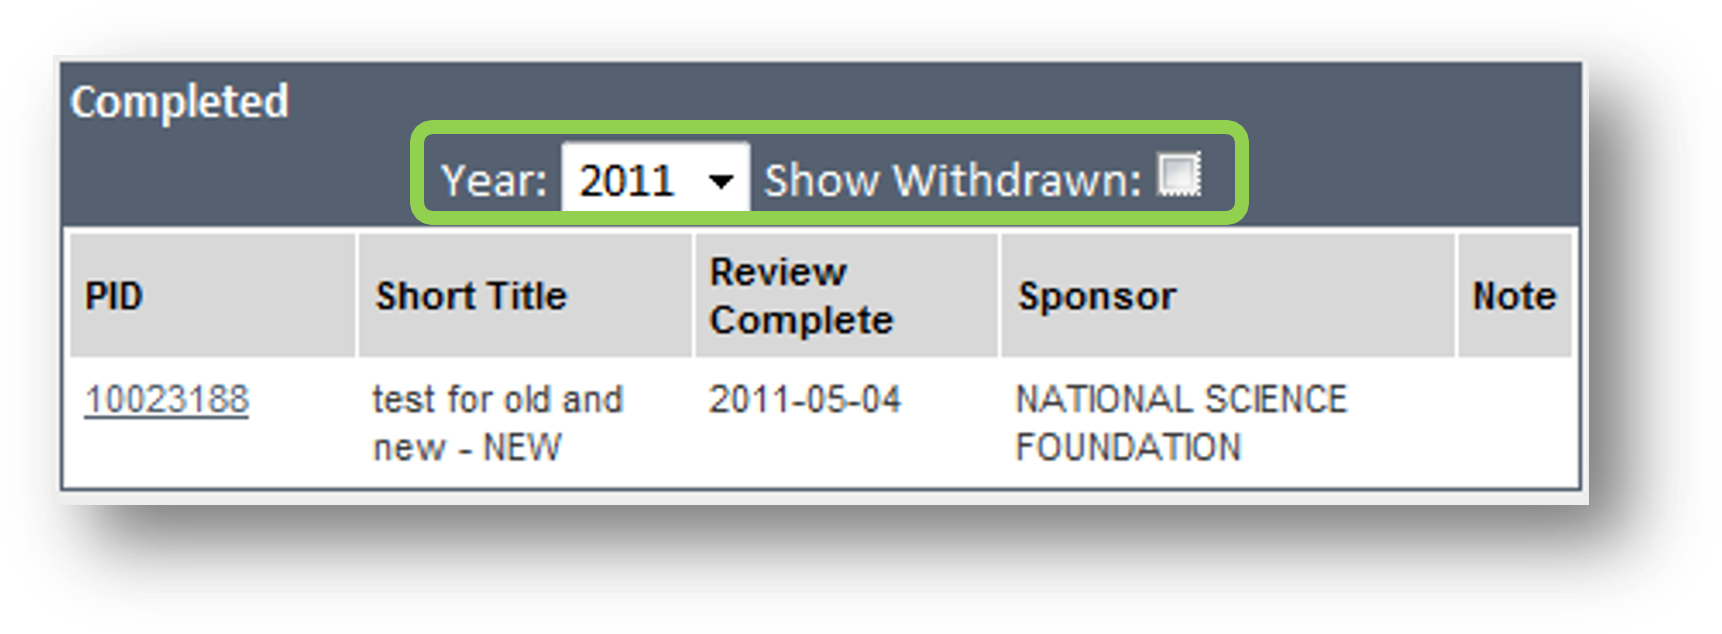
Figure 7: Completed Worklist
Awaiting My Approval
Users with approval roles will automatically see this worklist. Individuals who would not normally be an approver but were added as an ad-hoc approver will see this worklist as long as there exists for them a pending approval.

Figure 8: Awaiting My Approval Worklist
Quick Tips
You can switch between your approval roles to see eProposals pending your approval.
Figure 8 illustrates the following:
- The My Roles drop down menu displays the different roles assigned to the user. Elect to view approvals pending a specific role or choose All to view eProposals pending any approval roles assigned to the user.
- The Status drop down menu will display allows switching between the view from those that are Pending Approval, those that are Not Ready, or All.
Quick Tips
There’s a report for that…
You can run a report to see all eProposals in SPO review.
Pending OSP Review
Those who work in the Office of Sponsored Projects are the only people who will see the Pending OSP Review worklist. This worklist is meant to view, by SPO, the current list of eProposals being reviewed. It also has a feature to view those that have not yet been assigned.

Figure 9: Pending OSP Review Worklist
As figure 9 illustrates, the SPO can either choose to
- Assign him/herself as the sponsored projects officer.
- Browse to select and assign a different person as the sponsored projects officer.
Tracking Page
The Tracking page for each eProposal is viewable once it has been submitted for approval. The page is accessed by clicking on the Proposal Tracking link in the Section Navigation.
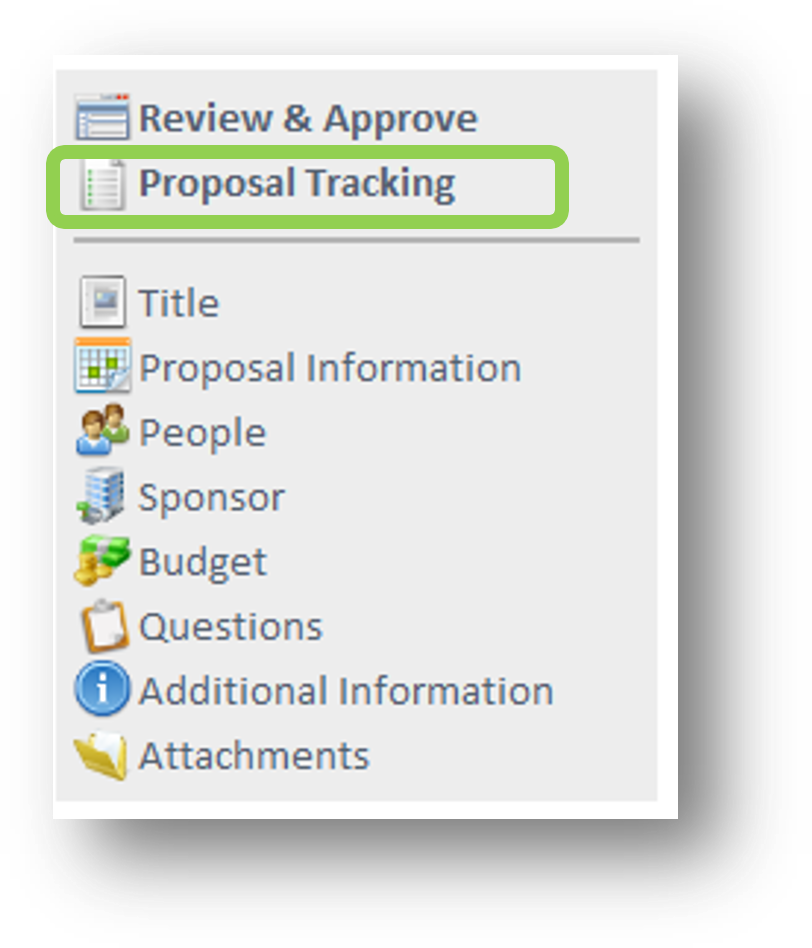
Figure 10: Only the most recent comment is displayed when hovering over the flag icon.
Clicking on the Section Navigation opens the navigation page. Comments are visible from this page via the flag ( ) icon. An entry is made into the tracking table that records the action taken, date/time, and user name when:
- An eProposal is Created
- An eProposal is Submitted for Approval
- An ad-Hoc approver is added or deleted
- An approval is satisfied
- A proxy is added or deleted
- An eProposal is Withdrawn
- An eProposal is Deleted (OSP only)
- A file is attached or deleted
Quick Tips
Comments…
Only the most recent comment is displayed when hovering over the flag icon.

Figure 11: eProposal Tracking
For Preparers
Preparing an eProposal
Because of the amount of information required to create a new eProposal, it is not uncommon for users to have to come back multiple times as they continue to gather the required information. With the addition of the validation indicators, it’s now easier than ever to leave and come back and know exactly what information is still needed.
Quick Tips
See Appendix 1 for a step by step guide on filling out each page and for data definitions of what information is being collected.
Step 1: Initiating a New eProposal
To create a new eProposal, select the DSS menu and click Create a DSS
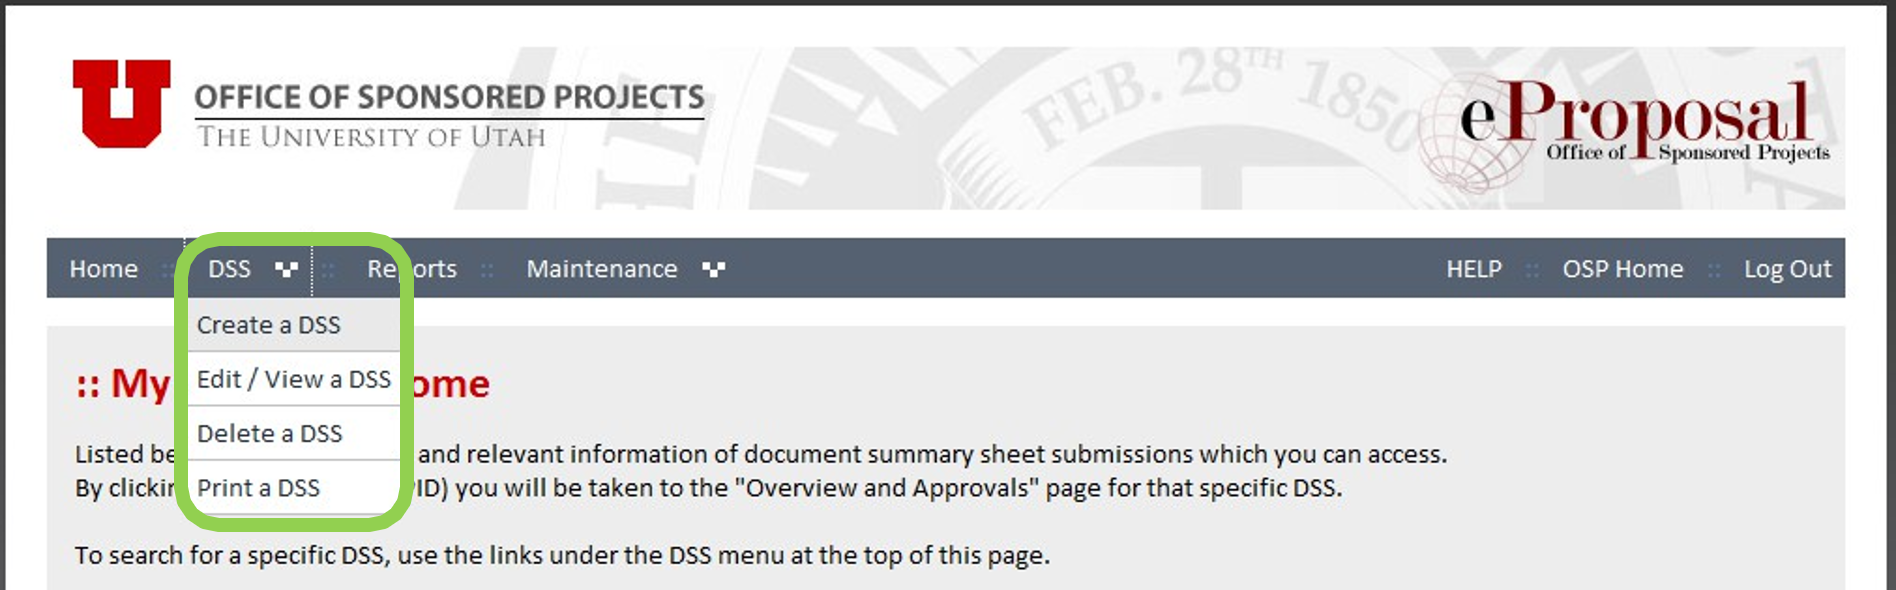
Figure 12: Create a DSS
Step 2: Filling out the Form
The pages are designed to be intuitive and easy to fill out. See Appendix 1 for a step-by-step guide on filling out each page of the form and definitions of data elements on each page.
Step 3: Resolving Validation Errors
Validation indicators are visible in eProposal after the first save. All validation errors must be satisfied before the eProposal can be submitted for approval. There are two kinds of icons that indicate that there is missing information on a page.
Section Navigation Indicators
When viewing/editing an eProposal the section navigation will display a yellow warning icon ( ) for each section that is missing required information. Mousing-over the icon will display the popup “One or more fields are missing on this page”.
If a section has multiple pages and one or more of its pages are missing information, an icon will display for the entire section. Figure 41 illustrates that clicking on that section will expand the page list and display which specific page is missing information.
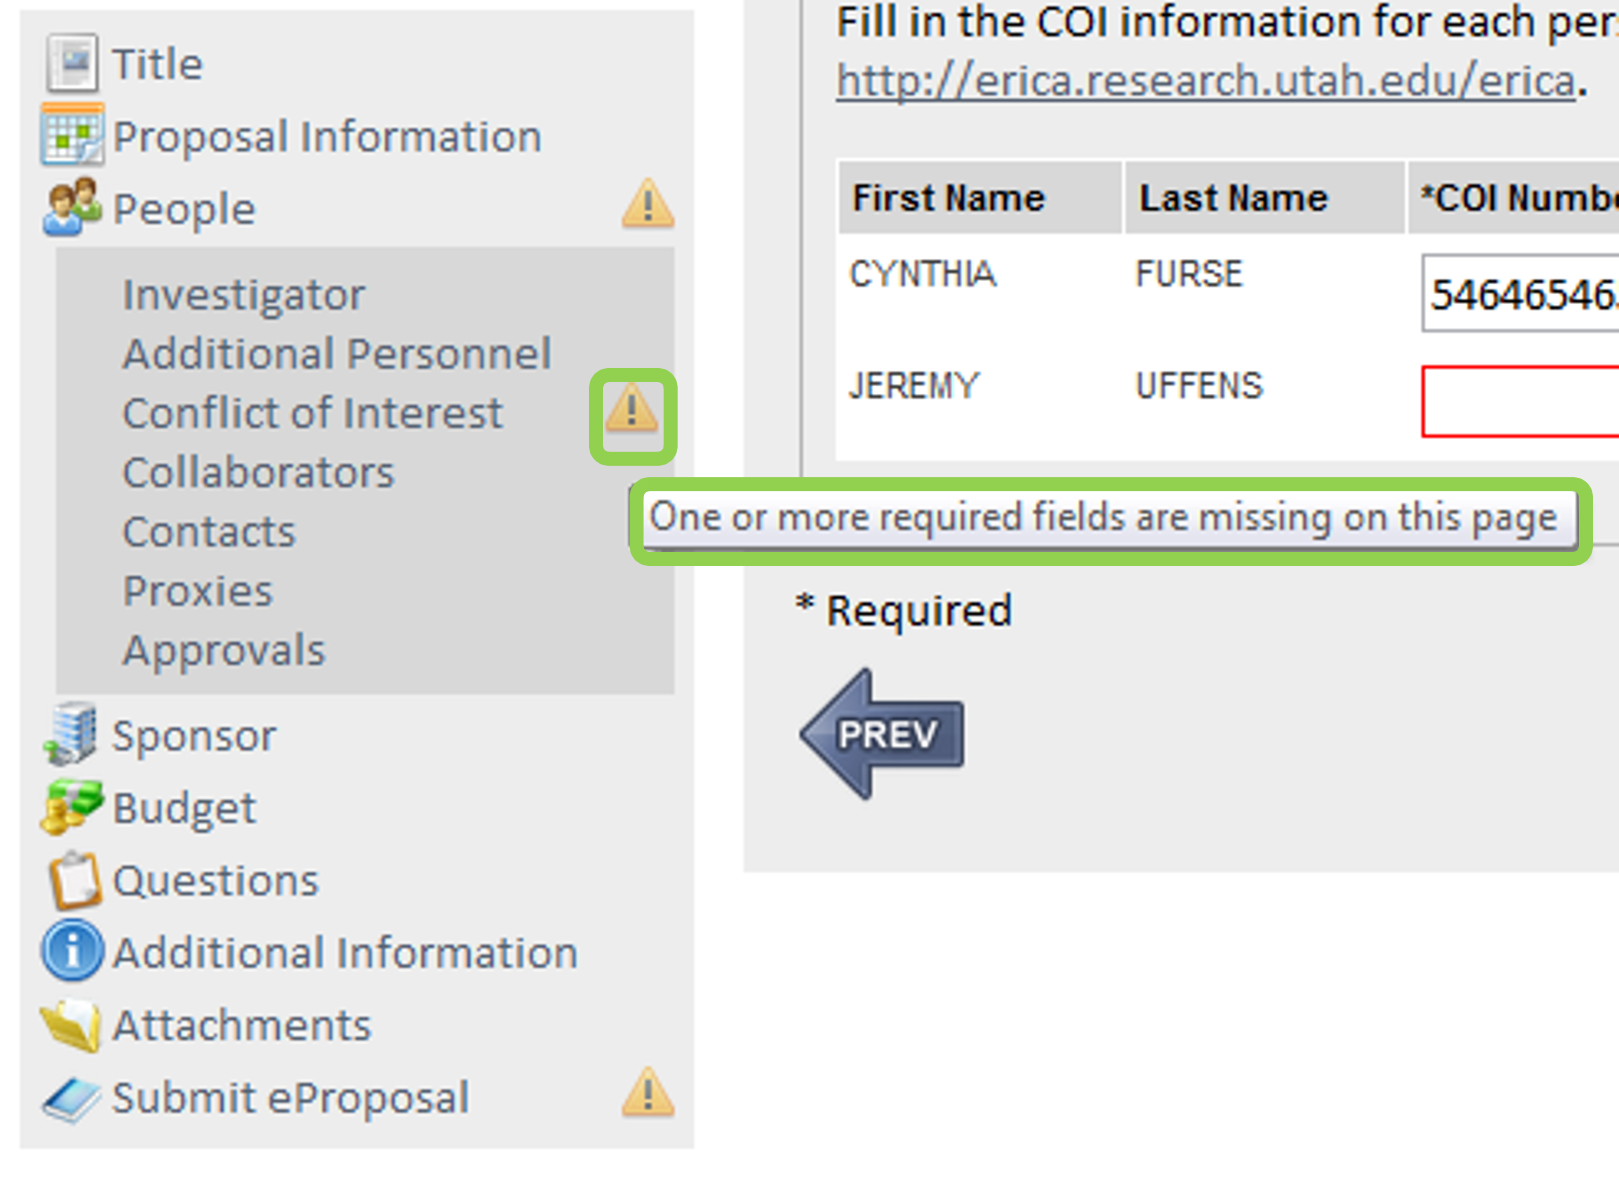
Figure 13: Section Navigation Validation Errors
Quick Tips
Validation icons must all be cleared before you can submit for approval.
On-Page Indicators
After viewing which pages are missing information, click on the Section Navigation to view the page. The on-page indicators easily help identify which required elements are missing by highlighting them in red. As soon as the required information is entered and saved the indicator is cleared on both the page and in the Section Navigation.
 Figure 14: On-Page Validation Indicators
Step 4: Submitting for Approval
In order to submit the eProposal for approval, all validation indicators must be cleared. The Submit eProposal page will show the ( ) icon and displays a list of missing information when validation errors still exist and will not let the user submit for approval.
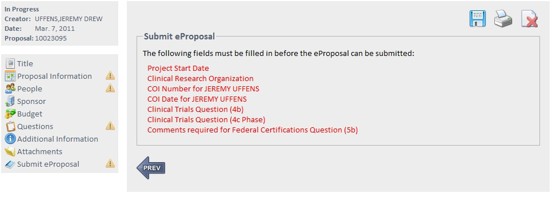 Figure 15: Submit eProposal Page – Validation Errors
Quick Tips
You must click on the Submit button on the page in order to submit your eProposal for approval.
When all validation errors are cleared, the Submit eProposal page shows a green check ( ) in the Section Navigation. Clicking on the page will display the message that the eProposal is ready to be submitted. You must click on the Submit button on this page in order to submit the eProposal for approval.
 Figure 16: Submit eProposal Page - No Errors
After the eProposal is submitted, the application changes the state to Pending Approval and the user sees the Review & Approve page. The first approver is notified and the approval process begins (See For Approvers).
Quick Tips
No Access?
Check with OSP if you’re not seeing the links that you think you should.
For College/Department Admins
This section describes the additional pages and functionality only available to those who have been setup as college/department administrators by OSP. OSP sets up one or more college administrators. After being setup, college administrators then have the ability to create other administrators within the college, or any departments that roll-up to that college. Similarly, once college-level administrators setup departmental administrators, they can setup other administrators within that department or within units that roll-up to that department.
Maintaining Approvals
Once an individual has been setup to be an administrator for a college or department by OSP, she/he has access within eProposal to create and maintain approval roles for that OrgID and any OrgID which reports to it.
Quick Tips
Role Hierarchy Roles are setup by organization. People are assigned to roles which are then assigned to eProposals.
The following illustrates what an administrator for the College of Engineering might see:

Figure 17: Maintain Roles

Figure 18: Maintain Roles Detail

Figure 19: Maintain Role Approvers
Figures 17 – 19 illustrate:
- To view approval roles select the Maintenance menu from the top navigation and click on Roles.
- The Maintain Roles page displays, by organization, the roles that can be modified. Listed are the organization’s name, role name, role level, an icon to click to maintain individuals assigned that role, and the option to delete the role.
- Clicking on the approver icon opens the Add Approver section of the page.
- Administrators can add and remove individuals that can approve for this role as well as assign the default approver.
Quick Tips
Role Setup
New roles can only be created for OrgIDs for which users have been setup as administrators.
Creating a New Role
o add a new approval role (see Figure 20)
- Select for which organization the new role will apply. Note – only organizations within the administrator’s security will be available in the type-ahead text field.
- Give the new role a name that will make it distinguishable from other roles. By default,
naming for director, chair and dean roles are setup in this format:
College of Engineering
Dean Chair of Bioengineering
Director of Energy & Geoscience Institute - Add the appropriate level for this approval role. (See Understanding Levels)
- Click Add a New Role to create the role.
- Find the role in the organization list, click on the user icon and add approvers as indicated in steps 2 - 4 above.

Figure 20: Add New Role
For Approvers
This section describes additional screens available only to those who are either listed as an ad-hoc approver or are assigned as an approver for a given approval role.
Quick Tips
Approved!
The Review & Approve page quickly shows all approvals for an eProposal.
Approval Actions
When viewing an eProposal that is in the Pending Approval state, there are two additional sections in the Section Navigation: Review & Approve and Proposal Tracking
Review & Approve
This page displays the pending approvals required for an eProposal. An approver can review the eProposal information in a single page by clicking the Expand to See Full button or he/she can click through the Section Navigation links. When the approver is ready to approve the eProposal he/she clicks the Review & Approve page. Figure 21 illustrates:
- If an approver can approve for a given role in the table, there will be icons visible to approve, not approve, or send back to the PI for revision. Comments are required when the action taken is to not approve or send back for revision.
- Notification emails will only be sent once the roles are listed as pending. Approvers can still approve before lower level approvals are satisfied.
- Once an approval has been satisfied, the system records who did the approval and when. This is particularly useful for roles with several alternate approvers.
Quick Tips
Notifications Emails are only sent once an assigned approval role is pending.
 Figure 21: Approval Actions
Figure 21 illustrates:
- If an approver can approve for a given role in the table, there will be icons visible to approve, not approve, or send back to the PI for revision. Comments are required when the action taken is to not approve or send back for revision.
- Notification emails will only be sent once the roles are listed as pending. Approvers can still approve before lower level approvals are satisfied.
- Once an approval has been satisfied, the system records who did the approval and when. This is particularly useful for roles with several alternate approvers.
Changing a Primary Approver
When there is more than one approver for an approval role, only the primary approver receives email notifications. To help facilitate updating the primary approver due to schedules etc., each approver has the security to change the primary approver for each of his/her approval roles.
Approvers can select the Maintenance menu item and slick on the Set Primary Approver link. (see Figures 22 - 23)

Figure 22: Set Primary Approver Menu
Once selected, the Approval Roles page displays all the roles for which the approver has been assigned. To change the primary approver
- Click on the approver icon.
- Change the primary approver by selecting the radio button in the appropriate column for the desired approver.
The change takes place immediately and no further action is necessary.

Figure 23: Assign Primary Approver
Quick Tips
Primary Approver
Only the primary approver gets emails. You can set a different approver as the primary as needed.
Reporting
There are a variety of reports available to most users that aid in monitoring and tracking status. The number of reports that are visible on the Reports page are dependent on the security of the user.
Additional reports may be added in the future. This section outlines those available to date.

Figure 24: Reports Page
To run a report click on the Reports menu link. Figure 24 illustrates:
- Click on the top folder to expand or collapse the reports list.
- Select a report from the eProposal Reports list.
- Enter any criteria to narrow your search results.
- Click View Report to see the report’s results in a web browser.
- Click Save as Spreadsheet to download the results in an Excel format.
Quick Tips
New Reports
We’re always looking to improve our reports. If you think something is missing, just let us know!
Status Reports
The status reports are publicly available although each has a different targeted audience. The reports return a similar set of data and have a similar set of criteria:
| Department: | The college or department |
| Include Rollup? | Include all organizations that report to the selected department |
| Status: |
The eProposal status: In Progress Pending Approval In OSP Review Review Complete |
| Start: | Varies depending on report, see below |
| End: | Varies depending on report, see below |
| Employee: | When required, this is the name of the listed PI. In most cases, can enter more than one. On the Sponsored Project Officers Status report the employee is restricted to names of SPOs. |
Table 3: Status Report Criteria
Department Status
This report gives eProposal summary information. It returns data based on the following criteria and all if none are selected.
Date criteria is selecting all eProposals with a creation date between the start and end date chosen.
PI Status
This report gives eProposal summary information based on an entered PI. At least one PI must be selected to run the report. It can be run for more than one PI at a time.
Date criteria is selecting all eProposals with a creation date between the start and end date chosen.
Sponsor Status
This report gives eProposal summary information based on an entered sponsor. At least one sponsor must be selected to run the report. It can be run for more than one sponsor at a time.
Date criteria is selecting all eProposals with a creation date between the start and end date chosen.
Sponsored Projects Officer Status
This report gives eProposal summary information based on the assigned Sponsored Projects Officer (SPO). At least one SPO must be selected to run the report. It can be run for more than one SPO at a time.
Date criteria is selecting all eProposals with a sponsor due date between the start and end date chosen.
Miscellaneous/Other Reports
Additional reports are available that are targeted for those who are approvers and those in administration. These reports use similar criteria as the Status Reports.
Approval History by EmplID
This report returns eProposal summary information based on those who have approved it and is only intended as a means for tracking statuses after the approval has been satisfied. This has been requested since once an approval is satisfied, the eProposal falls off of the Awaiting My Approval worklist for the approver. At least one approver must be entered to run the report, but more than one may be entered.
Approval Role by Org
This report is an administrative report that allows departments see a report of all of the approval roles and assigned approvers associated with their department. If a department is not entered then all results are returned.
Collaborator
The Vice President for Research asked that the Collaborators section be added to eProposal. This section collects a list of other faculty members, not involved with the project, who have reviewed the proposal and provided feedback. This report returns summary eProposal information for all individuals listed as collaborators within a specific date range.
Collaborator by EmplID
Similar to the Collaborator report, this report returns the same information but for specific PIs.
This concludes the quick tour. The next segment of this manual will go through a step-by-step creation of a new eProposal.
Appendix 1
Preparing an eProposal - Details
Because of the amount of information required to create a new eProposal, it is not uncommon for users to have to come back multiple times as they continue to gather the required information. Because of the validation indicators, it’s now easier than ever to leave and come back and know exactly what information is still needed.
Step 2: Filling out the Form
The process of filling out all of the required information is broken into several sections that may contain multiple pages. Each is outlined here along with a description of the data being collected on each page.
New eProposal
After clicking the Create a DSS link and before a proposal ID can be assigned, the user is prompted to enter 4 pieces of required information.
 Figure 25: Create new eProposal
Data elements on the page:
| Short Title (*required) | An abbreviation of the full title of the project, limited to 30 characters. This is the title that will print on reports. Please do not enter text that would identify proprietary or sensitive information or animal research. |
| Submission Office (*required) |
This is the office to which the proposal will be submitted. Research proposals for
grant or contract funding will be submitted to the Office of Sponsored Projects. Those
submitting proposals for Graduate Student Fellowships need to select the Graduate
School value. When selecting this value, a number of sections will have information
defaulted which cannot be changed. The following information will be defaulted: the
Graduate School Administrator will be populated in Investigator and Contacts sections,
Conflict of Interest Disclosure for the Investigator (enter COI information for the
Graduate School Fellow), Financial / Administrative Responsibility for Project section.
All other sections will need to be completed to finish the DSS. |
| Principal Investigator (*required) |
The principal investigator who will have primary responsibility for the project. Most
of the PI’s college, department, and contact information will default on the subsequent
pages. Use the type-ahead feature to find and select the PI. Search typing either
the first or last name or the employee id number. |
| Sponsor | The sponsoring agency for the proposed research. Use the type-ahead feature to find and select the Sponsor. Search by typing either the name or the sponsor id number. |
Table 4: New eProposal Required Data
Quick Tips
When using the auto-complete fields, select the item from the list and hit the TAB button.
Title Section
The first page in the wizard collects data required to initially save the eProposal. Most of the information on this page was already entered when the eProposal was first saved.
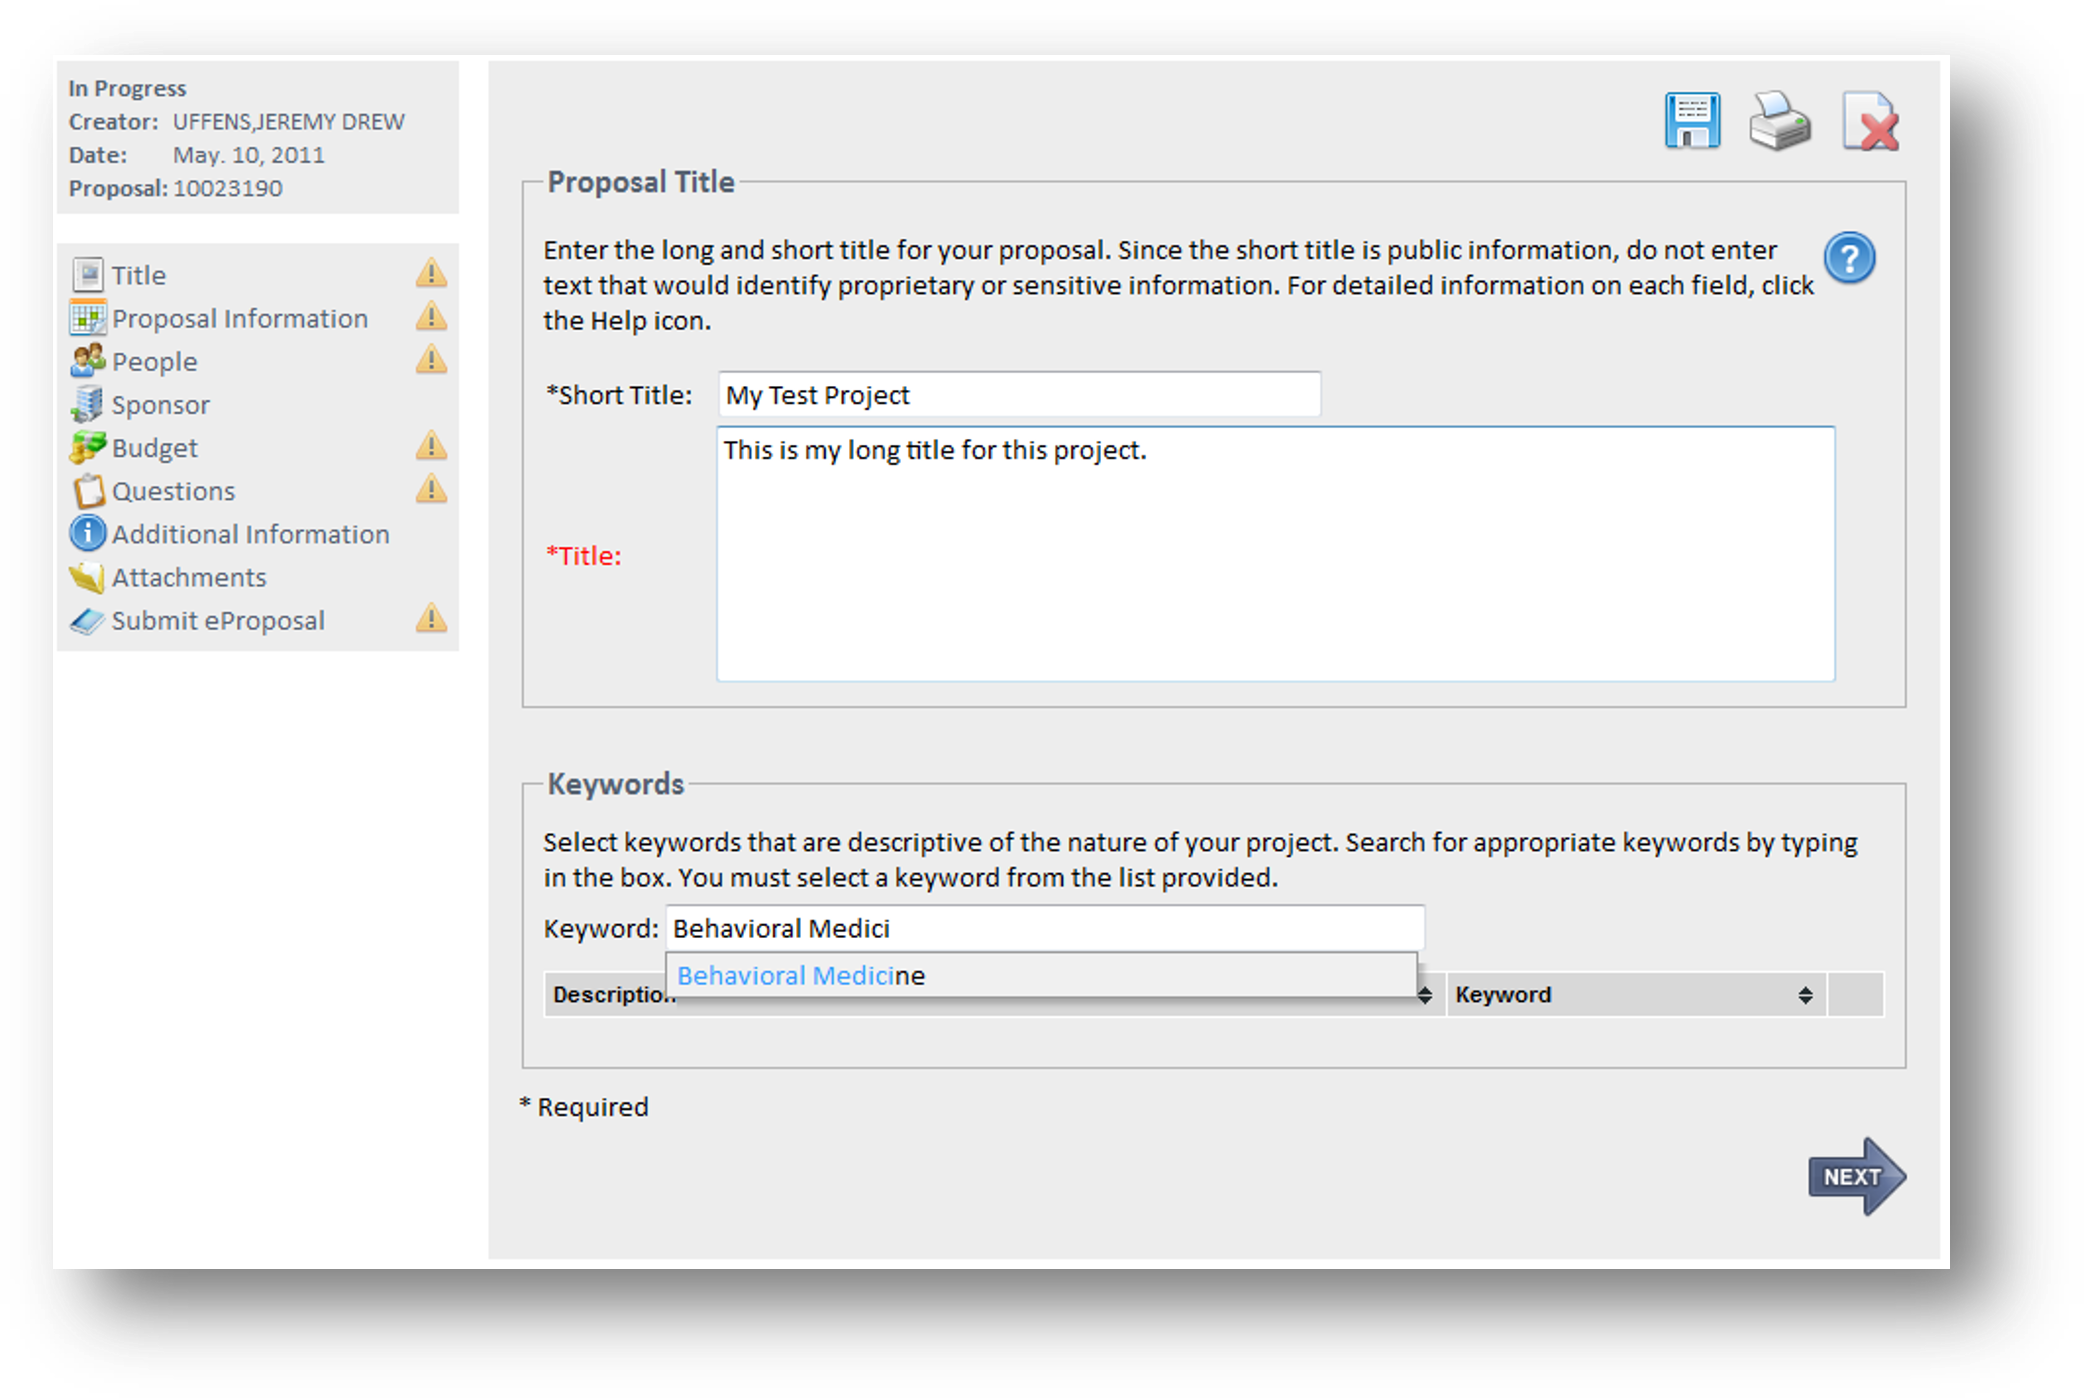 Figure 26: Title Section
Data elements on the page:
| Short Title (*required) |
This information will display what was entered on the New eProposal page and allow for updates. An abbreviation of the full title of the project, limited to 30 characters. This is the title that will print on reports. Please do not enter text that would identify proprietary or sensitive information or animal research. |
|
Title |
Full title of the project, limited to 256 characters. This title should match the Conflict of Interest Disclosure, IRB, and/or IACUC application title. |
| Keywords | Keywords are identifiers that are words descriptive of the nature of the project.
Keywords are meant for collaboration and reporting purposes. Use the type-ahead feature to search for and make a selection. |
Table 5: Title Section Data Elements
Proposal Information Section
Enter information specific to this proposal submission:
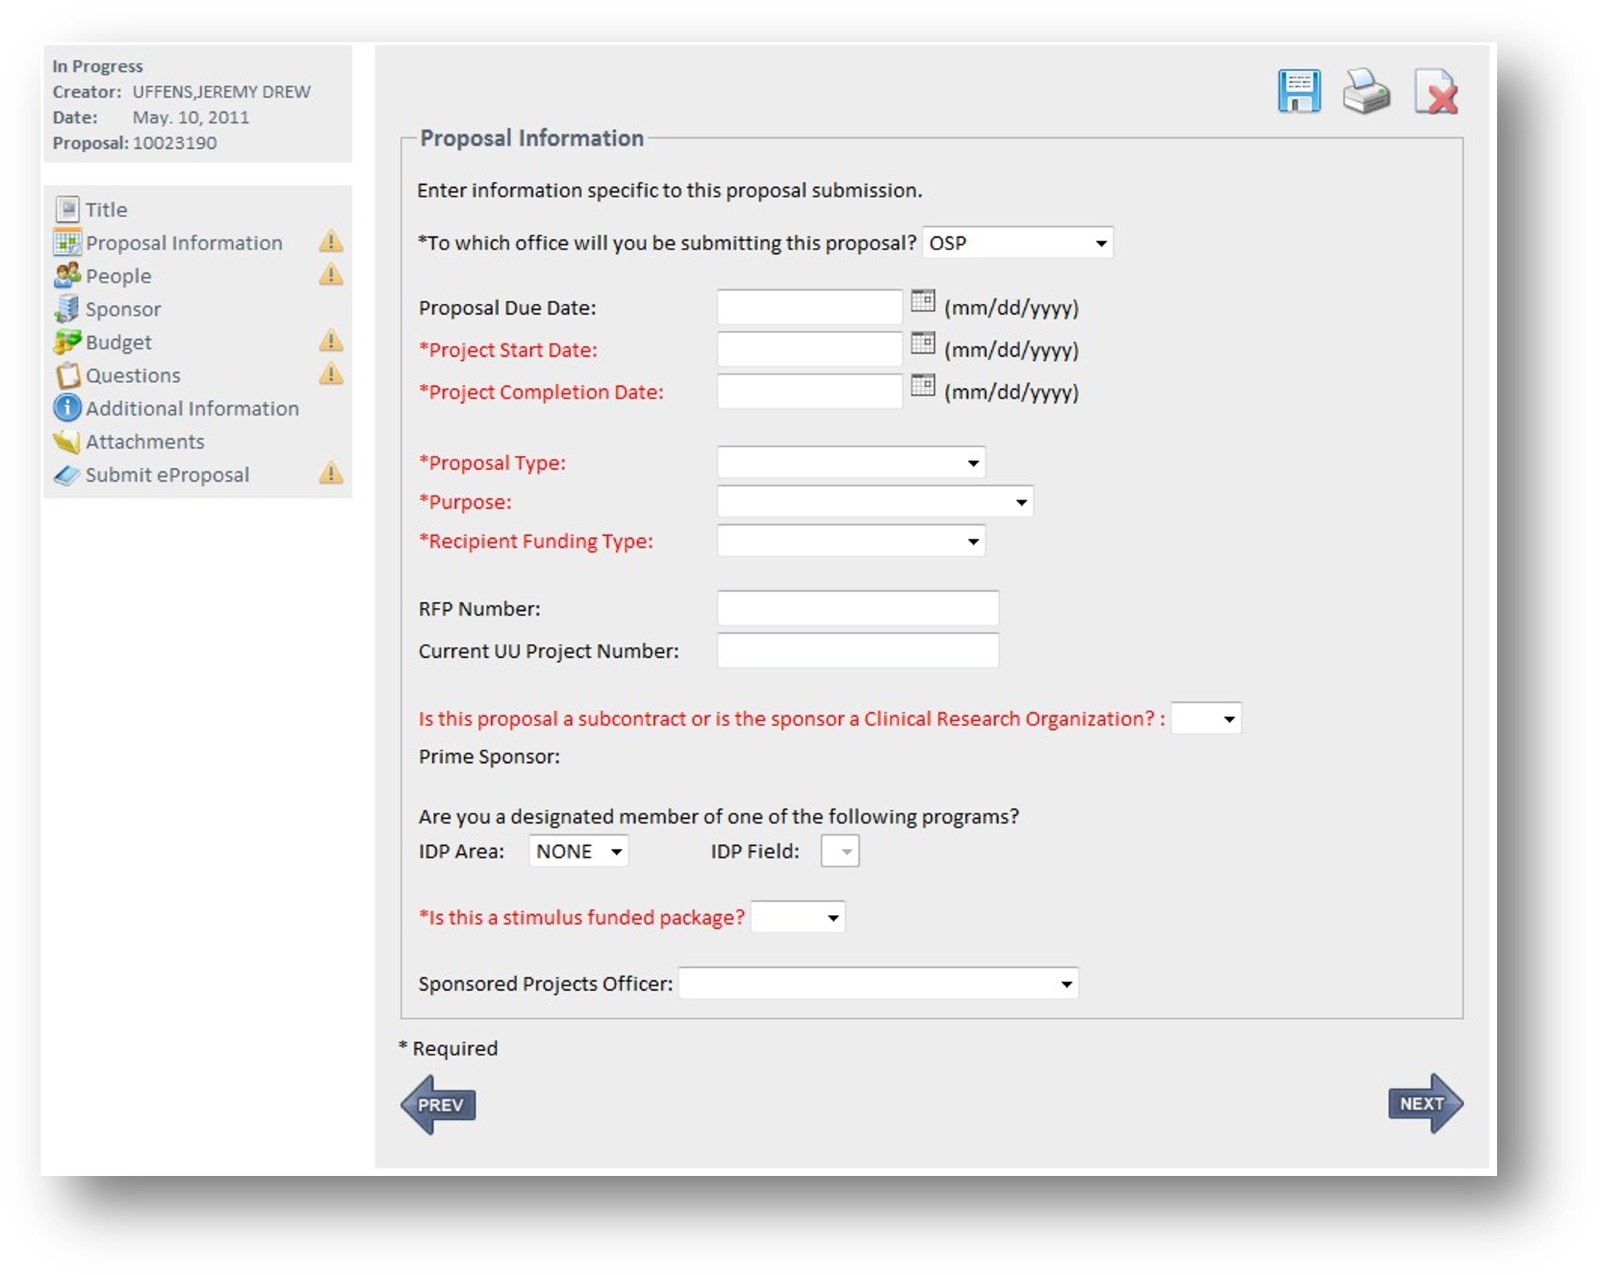 Figure 27: Proposal Information Section
Data elements on the page:
|
Submission Office (*required)
|
This will default from the New eProposal page. This is the office to which the proposal will be submitted. Research proposals for grant or contract funding will be submitted to the Office of Sponsored Projects. Those submitting proposals for Graduate Student Fellowships need to select the Graduate School value. When selecting this value, a number of sections will have information defaulted which cannot be changed. The following information will be defaulted: the Graduate School Administrator will be populated in Investigator and Contacts sections, Conflict of Interest Disclosure for the Investigator (enter COI information for the Graduate School Fellow), Financial / Administrative Responsibility for Project section. All other sections will need to be completed to finish the DSS. |
|
Proposal Due Date |
Date that the proposal is due to the sponsor. |
|
Project Start Date (*required) |
Enter the anticipated start date of your project if it is awarded |
|
Project Completion Date (*required) |
Enter the anticipated end date of your project if it is awarded |
|
Proposal Type (*required) |
Select the type of proposal from the drop down box provided. Choices include:
|
|
Purpose (*required) |
Select the purpose of the project for which the proposal is requesting funds from the drop down box provided. Choices include:
|
|
Recipient Funding Type (*required) |
The default value is PI Grant/Contract representing a funding source of a grant or contract for PI’s sponsored project. Select Fellowship Post Doc for a funding source of a fellowship for a post doc or Fellowship Grad Student for a funding source of a graduate student fellowship. |
|
RFP Number |
Enter the number assigned to the funding opportunity announcement by the sponsor. |
|
Current UU Project Number |
Enter the current eight digit project number as assigned by Research Accounting if seeking additional funding from the same sponsor for the continuation of the project. |
|
Clinical Research Org? (*required)
|
Check yes if the sponsor is passing money from a grant or contract they received with another funding agency. Otherwise check no. |
|
Prime Sponsor (*required) |
If answered yes to the question above, enter the funding agency that granted funds to the sponsor for this project. |
|
IDP Area |
Interdisciplinary Program Code. This is currently only used to identify and report on proposals for USTAR . |
|
IDP Field |
If USTAR, select which area/field. |
|
Stimulus Funded Package (*required) |
Required for ARRA Act. Used to flag proposals for ARRA reporting. |
|
Sponsored Projects Officer |
Select the name of the Sponsored Projects Officer who will review or negotiate your proposal from the drop down box provided. Look up OSP work assignments at http://www.osp.utah.edu/about_us/assignment.html to determine who should review this proposal or leave this box blank. |
Table 6: Proposal Information Data Elements
People Section
This section is broken down into additional pages to help collect similar people-related information on the same page.
Investigator Page
This page collects information about the principal investigator. Enter the Employee ID for the principal investigator. You can search for the Employee by typing the name or employee ID, then selecting them from the list. The PI's major appointment information will default.
All of the information except the fax and campus address will default based on the PI entered. The email address and phone number may be modified if it is not up-to-date.
 Figure 28: Investigator Page
Data elements on the page:
|
PI (*required) |
The principal investigator who will have primary responsibility for the project. Most of the PI’s college, department, and contact information will default on the subsequent pages. Use the type-ahead feature to find and select the PI. Search typing either the first or last name or the employee id number. |
|
Email (*required) |
This information will default if the EmplID is entered and accepted and the information is on file with Human Resources (HR). If the information reflected is incorrect, manually correct the information by typing over it. |
|
Phone (*required) |
This information will default if the EmplID is entered and accepted and the information is on file with Human Resources (HR). If the information reflected is incorrect, manually correct the information by typing over it. |
|
Fax |
Enter the phone number of the fax machine where the PI would like correspondence sent. |
|
Department (*required) |
This information will default if the PI's EmplID or Org ID is entered and accepted. |
|
College (*required) |
This information will default if the PI's EmplID or Org ID is entered and accepted |
|
Campus Address (*required) |
Enter the mailing address for intra-campus mail - a combination of the PI's building code and room number (i.e. SOM 4A100). A list of building codes can be found at http://www.map.utah.edu/. |
|
Location ID (*required) |
This information will default if the PI's EmplID is entered and accepted. To revise, enter the ten digit number that is a combination of the building number and a specific room number. The UU's look up table for location codes can be found at |
Table 7: Investigator Data Elements
Additional Personnel Page
Other faculty or staff associated with the proposal may be entered here. Anyone added
will be required to fill out a conflict of interest disclosure. Search for the employee
by typing the name or employee ID, then selecting from the list. Choose the personnel
type from the drop down list.
Figure 29: Additional Personnel Page
| EmplID |
The EmplID will display along with the name in the search. Search for the additional personnel by name or id. |
| Type | Select Addl. PI for other investigators participating in this research endeavor. Select Fellow PD for a Post Doc applying for a research fellowship. Select Fellow GS for a Graduate Student applying for a research fellowship. In the case that this proposal is a Graduate School Fellowship, a faculty member needs to be added to the Additional Investigators section and Mentor is selected for this person who will act as the mentor to the Graduate School Fellow. |
| Deptid | Verify the Org ID of the Additional Investigator's home department (department of primary appointment). This information will default if the EmplID is entered and accepted. Change the defaulted Org ID by typing the appropriate OrgID over the default and tabbing or search for an appropriate OrgID by clicking on the adjacent magnifying glass. |
| Dept/Div | This information will default if the EmplID or Org ID is entered and accepted. |
Table 8: Additional Personnel Data Elements
Conflict of Interest Page
Fill in the COI information for each person identified as either the PI or additional personnel, after they have completed the disclosure online at http://erica.research.utah.edu/erica. Currently there is no programmatic integration with Erica.
 Figure 30: Conflict of Interest Page
| COI Number (*required) | Enter the Conflict of Interest (COI) Disclosure number that has been assigned to each PI for this proposal (only need the last eight digits; do not include COI_). Must also have submitted a disclosure to COI at https://erica.research.utah.edu for each proposal. |
| Certification Date (*required) | Enter the date received the COI Disclosure number in the following format: MM/DD/YYYY. Or select the date from the adjacent calendar. |
| Conflict Identified | Indicate if a potential conflict was identified during the disclosure process by selecting Yes or No from the drop down box provided. |
Table 9: Conflict of Interest Data Elements
Collaborators Page
Enter the employee ID of other faculty members, not involved with your project, who have reviewed your proposal and provided feedback
 Figure 31: Collaborators Page
| EmplID/Name | The EmplID will display along with the name in the search. Search for the additional personnel by name or id. |
Table 10: Collaborators Data Elements
Contacts Page
List an additional department contact for this project, besides the PI, that can help answer pre- or post- award questions. Enter the employee ID for the contact and the other information will default. If the information is incorrect, it can be corrected by the person entering the data.
 Figure 32: Contacts Page
| EmplID/Name | Enter the eight digit employee number (NOT the Unid) of the person who should be contacted with questions during the review of the proposal. By entering the employee ID number and tabbing, the following information will default: First Name, Last Name, Phone, and E-mail |
| Phone | Enter the phone number (direct line) of the pre-award contact. This information will default if the EmplID is entered and accepted and it is on file with HR. If the information reflected is incorrect or missing, manually correct the information by typing into the box. |
| Fax | Enter the phone number of the fax machine where correspondence should be sent. |
| Enter the e-mail address of the pre-award contact. This information will default if the EmplID is entered and accepted and it is on file with HR. If the information reflected is incorrect or missing, manually correct the information by typing over it. |
Table 11: Contacts Page Data Elements
Proxies Page
Those with security access to view and make changes to an eProposal are listed on this page. To delegate access to additional university personnel, grant them security by adding them as a Proxy.
 Figure 33: Proxies Page
| Employee | The EmplID will display along with the name in the search. Search for the additional personnel by name or id. |
Table 12: Proxies Page Data Elements
Approval Page
This page shows the approvals that will be required before the eProposal can be reviewed by the Office of Sponsored Projects. Click on the “?” icon to see additional help information for this page.
Add additional approvers by entering an approval level and the approver name. Levels can be any number and indicate the order by which the approvals occur from lowest to highest.
 Figure 34: Approvals Page
| Approver Level |
Generally the levels are setup so approvals are satisfied in this order; however they may vary by college/department:
When adding an additional approver, enter a level such that the new approver will satisfy his/her approval in the desired order. |
| EmplID/Name | The EmplID will display along with the name in the search. Search for the additional personnel by name or id. |
Table 13: Approvals Page Data Elements
Sponsor Section
The sponsor is the entity that is directly giving the University of Utah their funding, not where the funding originates. Search for a sponsor by typing in the name or sponsor number. If the sponsor is not found, type in the legal name of the sponsor. A number will be assigned by OSP after receipt of the DSS. Address and contact information is not required but is helpful for industry-sponsored proposals.
 Figure 35: Sponsor Page
Data elements on the page:
| Sponsor/Name (*required) | Enter the name of the sponsor the proposal is requesting funding from. This box must be completed in order to begin saving the proposal information. The information will default if the Sponsor ID is entered and accepted. Manually enter a sponsor name by typing into the available box. |
| Address | Enter the mailing address for the sponsor. Not required to submit the proposal. |
| Sponsor Contact Name | Enter the name of the person at the Sponsor to whom we can direct questions. Not required to submit the proposal. |
| Phone | Enter the ten digit phone number (direct line) of the contact at the Sponsor. Not required to submit the proposal. |
| Fax | Enter the ten digit phone number of the fax machine where correspondence to the Sponsor can be sent. Not required to submit the proposal. |
| Enter the e-mail address of the contact at the Sponsor. Not required to submit the proposal. |
Table 14: Sponsor Page Data Elements
Budget Section
Budget Information Page
Enter the direct, indirect and cost share amounts for each budget period. At least one budget period is required. The totals will auto calculate. Add additional rows for additional periods. If this is a pre-proposal and no budget is required, leave the default zeroes in the boxes.
 Figure 36: Budget Page
Data elements on the page:
| Direct Cost | Enter the dollar amount of the direct costs requested from the sponsor for each project year. Use the Tab key to advance to the next field. |
| F&A | Enter the dollar amount of the indirect costs requested from the sponsor for each project year. Use the Tab key to advance to the next field. |
| Total Sponsor Request | This is the total amount of money requested from the sponsor (Direct Cost + F&A). This field will default after completing the two previous fields. |
| UU Cost Share | Enter the dollar value of items or services that you are providing for this project, but not requesting reimbursement for from the sponsor (i.e. PI effort on the project that is not being paid by the sponsor) for each project year. Use the Tab key to advance to the next field. |
| 3rd Party Cost Share | Enter the dollar value of items or services that another party is providing for this project, but not requesting reimbursement for from the sponsor (i.e. neighborhood community center staff time) for each project year. Use the Tab key to advance to the next field. |
| Total Cost Share | This is the total amount of cost share being provided to the project that is not being reimbursed by the sponsor (UU Cost Share + 3rd Party Cost Share). This field will default after completing the two previous fields. |
| Total Budget | This is the total budget for the project, including sponsor reimbursement and cost share (Total Sponsor Request + Total Cost Share). This field will default after completing the previous fields. |
Table 15: Budget page Data Elements
Questions Section
For each group of questions, review all of the questions on the page. If you can answer no to all of the questions, select the No button in the first question and all of the sub questions will automatically be answered No as well. Some questions require additional information if the answer is Yes.
The following are the 7 pages of questions currently required:
 Figure 37: Questions Group 1 - Budget

Figure 38: Questions Group 2 - Contract & Technology

Figure 39: Question Group 3 - University Resources
Clinical Trials: These questions are only visible if the proposal includes a clinical component. If you selected Clinical as the purpose of your project on the proposal information page, this section will be active and must be completed.
 Figure 40: Question Group 4 - Clinical Trials

Figure 41: Question Group 5 - Federal Certifications
 Figure 42: Question Group 6 - Federal Research Compliance
 Figure 43: Question Group 7 - Regulatory Compliance
Additional Information Section
Enter any additional information that should be sent to OSP.
 Figure 44: Additional Information Page
Data elements on the page:
| Comments | Enter any additional information that should be sent to OSP regarding this eProposal. |
Attachments Section
Click on the Browse button to attach documents for your proposal. This could include budgets, certifications, the proposal or anything you'd like saved with the DSS.
Answering yes to questions 1g or 1h require you to upload a specific type of document. Choose which document will be uploaded before clicking save.
Data elements on the page:
| Choose File | Valid file types: .doc, .docx, .xls, .xlsx, .xfd, .pdf |
| Attachment Type | If questions 1g or 1h are answered yes, then attachments must be uploaded with the appropriate type: F&A Waiver, Cost Share Form |
Appendix 2
 Figure 45: Generated Approvals Diagram
 Figure 46: Path of an eProposal